

TextField를 커스터마이징하면서 새롭게 알게 된 몇 가지를 정리해보려 한다.
>> TextField 관련 애플 공식문서 : 링크
1. CornerRadius를 주기 위해, clipsToBounds를 true로 설정해야 한다.
TextField는 1) 여러개의 하위 뷰로 구성되어 있으며, 2) clipsToBounds 속성은 디폴트값이 false이다.
이 두 가지 이유때문에 cornerRadius를 주려면 clipsToBounds를 true로 설정해주어야 한다.
👉 clipsToBounds란?

clipsToBounds는 하위 뷰가 현재 뷰보다 큰 상황에서 그 특징이 잘 드러날 것 같다.
즉, 하위 뷰가 상위 뷰보다 클 경우, 하위 뷰를 현재 뷰의 경계에 맞춰 자를 것인지 여부를 결정해 준다.
true로 설정할 경우 상위 뷰의 경계에 맞게 자르고,
false로 설정할 경우 하위 뷰가 상위 뷰보다 커도 잘리지 않는다.
▶️ code
cornerRadius로 textField의 모서리를 깎고싶다면
textField는 여러 뷰로 구성되어 있으므로, clipsToBounds를 true로 설정해주어야
하위 뷰까지 함께 깎여 원하는 뷰를 얻을 수 있다.
[self.idTextField,
 self.pwTextField].forEach {
    $0.clipsToBounds = true
    $0.layer.cornerRadius = 30
}
2. TextField의 여백 설정 - leftView, leftViewMode
아래 사진처럼 텍스트가 뷰에 딱 붙어있는 것 같다면 다음 코드처럼 패딩을 줄 수 있다.
<before>
<after>

아래는 왼쪽 여백을 추가하는 코드이다.
[self.idTextField,
 self.pwTextField].forEach {
    $0?.leftView = UIView(frame: CGRect(x: 0.0, y: 0.0, width: 10.0, height: 0))
    $0?.leftViewMode = .always
}
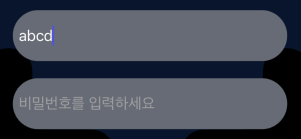
3. 입력 텍스트와 placeHolder 텍스트 색상 별도 설정
위 사진처럼 사용자가 입력한 텍스트의 색상과, placeHolder 텍스트 색상을 다르게 줄 수 있다.
▶️ placeHolder text color
textField.attributedPlaceholder = NSAttributedString(string:attributes:) 을 활용하면 된다.
idTextField.attributedPlaceholder = NSAttributedString(string: "아이디를 입력하세요", attributes: [NSAttributedString.Key.foregroundColor : UIColor.lightGray])
pwTextField.attributedPlaceholder = NSAttributedString(string: "비밀번호를 입력하세요", attributes: [NSAttributedString.Key.foregroundColor : UIColor.lightGray])
▶️ input text color
textField.textColor = UIColor 을 활용하면 된다.
[self.idTextField,
 self.pwTextField].forEach {
    $0?.backgroundColor = PrimaryContainerColor
    $0?.textColor = LabelTextColor
}